ESP8266
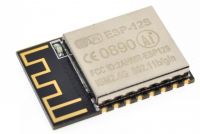
The ESP8266 from Espressif is a microcontroller with a WiFi connection. The chip is used in a lot of different modules, like the ESP-12S but it is also available on different breakout boards that have some added functionality.
These modules and boards are available with different firmware images installed.
Originally, the ESP-12 modules came with an "AT-command" style firmware but nowadays you have the option to use the module (or any of the boards) from within the Arduino environment or with a MicroPython installation.
You can either download the complete source from GitHub and make your own binary or just download a pre-compiled image from micropython.org/download.
Extensive documentation about MicroPython and the ESP8266 implementation is available from docs.micropython.org
Wemos D1 mini
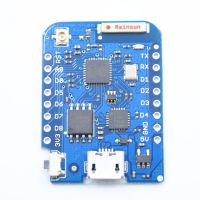
The D1 mini from Wemos is a breakout board for the ESP8266. Shown here is the D1 mini Pro. This board has a 16MB Flash and a CP2104 USB-serial converter. It is powered directly from the USB port, making it an ideal board for development purposes.
Another board, also from Wemos, is the D1 mini v2. This board uses a different USB-serial converter and has only 4 MB of flash.
Both boards are available from TinyTronics.
Yes, I know ... I could buy those boards from China and save a few Euros but Tinytronics also has all the other stuff I want and next day delivery (within the Netherlands) means I don't have to keep a lot of those boards on stock.
Let's go Flash!
Before using the board, we need to program the flash on the board with a binary program.
First of all, download and install the esptool (download from github). I just downloaded and unpacked the tool and that all I needed to do, but I already have other things (like python) installed and configured on my PC.
You will also need an image to flash. Precompiled and configured images are available from micropython.org/download. Use the one ending in .bin - that's the one you need.
The instructions below are for Windows but doing this on Linux or with OS-X should be similar.
When esptool is installed, open a command prompt in the directory where the tool is. Make sure a copy of the esp8266...bin file is also available in that directory.
Typing the command esptool.py --help should bive you an overview of the supported commands.
On all commands below, rplace COM32 with your COM port.
If everything is working, check if the communication with the module works.
I use esptool.py --port COM32 chip_id to check this as shown below:
| E:\esptool-master>esptool.py --port COM32 chip_id esptool.py v2.1 Connecting.... Detecting chip type... ESP8266 Chip is ESP8266 Uploading stub... Running stub... Stub running... Chip ID: 0x002dd65a Hard resetting... E:\esptool-master> |
Next, make sure the flash is empty. Micropython will only use part of the flash for its program and the rest of the flash is used as a flash drive. We don't want to confuse Micropython during initial setup.
Type esptool.py --COM32 erase_flash to erase the flash:
| E:\esptool-master>esptool.py --port=COM32 erase_flash esptool.py v2.1 Connecting.... Detecting chip type... ESP8266 Chip is ESP8266 Uploading stub... Running stub... Stub running... Erasing flash (this may take a while)... Chip erase completed successfully in 6.4s Hard resetting... |
Now write the micropython image in the flash. This command is a bit more extensive than the previous ones:
Type: esptool.py --port=COM32 --baud 115200 write_flash --flash_mode dio --flash_size=4MB 0 esp8266-20170823-v1.9.2.bin
| E:\esptool-master>esptool.py --port=COM32 --baud 115200 write_flash --flash_mode dio --flash_size=4MB 0 esp8266-20170823-v1.9.2.bin esptool.py v2.1 Connecting.... Detecting chip type... ESP8266 Chip is ESP8266 Uploading stub... Running stub... Stub running... Configuring flash size... Flash params set to 0x0240 Compressed 601136 bytes to 392067... Wrote 601136 bytes (392067 compressed) at 0x00000000 in 34.8 seconds (effective 138.3 kbit/s)... Hash of data verified. Leaving... Hard resetting... |
AFter this, the board should reboot in micropython. The blue LED will flash a few times during reboot. If it keeps flashing, something went wrong. See the section below for possible solutions.
Open your favourite terminal program (I use PuTTY), you will see the welcome message followed by the REPL command prompt:
| WebREPL daemon started on ws://192.168.4.1:8266 Started webrepl in normal mode OSError: [Errno 2] ENOENT MicroPython v1.9.2-8-gbf8f45cf on 2017-08-23; ESP module with ESP8266 Type "help()" for more information. >>> |
Troubleshooting
Different boards have different flash chips and different flash sizes.
Depending on this you may need to change some of the options used when flashing the board.
First of all make sure that your USB port is able to supply enough power. Some USB ports on laptops will not work at all and most unpowered USB Hubs will also have problems. Writing to flash takes quite some power and if the power drops even only a bit programming will fail.
Only use USB ports directly on your PC and on laptops, check other ports when python does not boot. I tried programming through a USB Hub but although the esptool gave no error message at all, micropython did not run properly.
You may notice that I specified --flash_size 4MB on my board, yet the board has a 16MB flash memory. As I discovered after flashing and googling around, the current ESP8266 version (dated August 23, 2017) does not support the full 16MB of flash. Specifying 16MB of flash or leaving it on auto-detect will result in rebooting of the module.
I now have 2 different versions of the board. One board is marked with "v1.0.0" and the other board with "v1.1.0".
On the v1.1.0 board I need to use the --flash_mode dio option. The v1.0.0 board works without specifying this.
Uploading files
The REPL (Read Evaluate Print) prompt is nice, but we need some way to get 'real' programs into flash.
In order to do this, we need something called "webrepl".
On the repl prompt, type import webrepl_setup. You will now be asked if you want to run webrepl at startup and a password to protect access to your target.
| MicroPython v1.9.2-8-gbf8f45cf on 2017-08-23; ESP module with ESP8266 Type "help()" for more information. >>> import webrepl_setup WebREPL daemon auto-start status: disabled Would you like to (E)nable or (D)isable it running on boot? (Empty line to quit) > e Would you like to change WebREPL password? (y/n) y New password: test123 Confirm password: test123 Changes will be activated after reboot Would you like to reboot now? (y/n) y |
In order to use webrepl, you also need to download the webrepl client from github <link>. Unzip this in a directory and load the webrepl.html in your browser. Specify the IP address (if the ESP8266 is used as Access Point the correct address is already given) and log in with the correct password. Now the repl prompt will be replicated in yout browser and you can upload files to the flash.
Yes, this is all a bit simple. There is no means to list the content of the flash and you can also not delete any files from flash. This you still have to do with some python commands on the repl prompt, but this is at least a basic means of getting programs in flash.
Flash filesystem use
Like in regular Python, MicroPython has an os module you can import.
Just try import uos followed by help(os) and most likely you will get a good idea of what you can do.
Alternatively, have a look at the micropython documentation <link> for a description of the OS module.
Have a look at the micropython output below to see how to show the directory content and how to delete a file you no longer need:
| >>> import uos >>> uos.listdir() ['boot.py', 'webrepl_cfg.py', 'server.py'] >>> uos.remove('server.py') >>> uos.listdir() ['boot.py', 'webrepl_cfg.py'] >>> |
The file boot.py is the file that is executed by micropython when the system boots and it contains system configuration settings. To start your code during power-up or reset, create a file called main.py with your own code.
For WeMos boards and more, shop at:
